Test/Dev Workflow using Docker Compose

As we continue to dig deeper and build off each article, I wanted to mimic a Test/Dev workflow leveraging Docker.  Below we will create an image and use Docker Compose to deploy the application in our Dev Environment.  In part 2. we will take the results of this blog and send to Travis CI for testing.

First, let’s make sure we have nodejs installed: 

Screenshot from the Docker Compose Test and Development Workflow walkthrough at step 1; the adjacent article text explains that first, let’s make sure we have nodejs installed.

$ apt install nodejs

Make sure  you have downloaded nodejs

Screenshot from the Docker Compose Test and Development Workflow walkthrough at step 2, showing npx: installed 64 in 4.6795; the adjacent article text explains that make sure you have downloaded nodejs.

$ npx create-inferno-app webappinferno

$ cd webappinferno

Now we have our application downloaded

Screenshot from the Docker Compose Test and Development Workflow walkthrough at step 3; the adjacent article text explains that the walkthrough has our application downloaded.

$ ls -la

Just taking a look to make sure all our files are here

Screenshot from the Docker Compose Test and Development Workflow walkthrough at step 4; the adjacent article text explains that just taking a look to make sure all our files are here.

$ npm run test

Works

Screenshot from the Docker Compose Test and Development Workflow walkthrough at step 5; the adjacent article text explains that $ npm run build.

$ npm run build

Works

Screenshot from the Docker Compose Test and Development Workflow walkthrough at step 6; the adjacent article text explains that $ npm run start.

$ npm run start

Works

Screenshot from the Docker Compose Test and Development Workflow walkthrough at step 7, showing On Your Network; the step instructs the user to gives us a URL to hit on port 3000.

Gives us a URL to hit on port 3000

Screenshot from the Docker Compose Test and Development Workflow walkthrough at step 8; the step instructs the user to gives us a URL to hit on port 3000.

Able to hit the webpage locally on port 3000

Everything appears to be working alright – now time to make an image

Screenshot from the Docker Compose Test and Development Workflow walkthrough at step 9, showing RUN npm install; the adjacent article text explains that everything appears to be working alright - now time to make an image.

$ vim Dockerfile.dev

*note we are putting .dev on here to show this is a dev file

FROM node:alpine
WORKDIR '/app'
COPY package.json .
RUN npm install
COPY . .
CMD ["npm", “run”, "start"]

Screenshot from the Docker Compose Test and Development Workflow walkthrough at step 10, showing Sending build context to Docker daemon 266.64B; the adjacent article text explains that $ docker build -f Dockerfile.dev.

$ docker build -f Dockerfile.dev .

*We use the -f to specify a certain file we want to use, without the -f it would look to deploy Dockerfile which doesn’t exist

Screenshot from the Docker Compose Test and Development Workflow walkthrough at step 11; the adjacent article text explains that the walkthrough use the -f to specify a certain file we want to use, without the -f it would look to deploy Dockerfile which doesn’t exist.

built

Screenshot from the Docker Compose Test and Development Workflow walkthrough at step 12; the adjacent article text explains that removed the node_modules DIR so we don’t get multiple sets of dependencies.

Removed the node_modules DIR so we don’t get multiple sets of dependencies

Screenshot from the Docker Compose Test and Development Workflow walkthrough at step 13; the adjacent article text explains that removed the node_modules DIR so we don’t get multiple sets of dependencies.

$ docker run -it -p 3000:3000 pbryant/webappinferno:latest
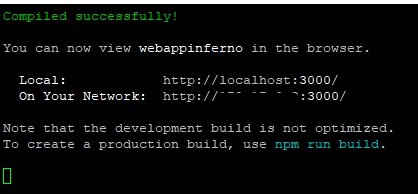
Screenshot from the Docker Compose Test and Development Workflow walkthrough at step 14; the adjacent article text explains that $ docker run -it -p 3000:3000 pbryant/webappinferno:latest.

It now gives us a URL to hit on port 3000

*if provided network doesn’t work then go to your local host network port 3000

Screenshot from the Docker Compose Test and Development Workflow walkthrough at step 15; the adjacent article text explains that if provided network doesn’t work then go to your local host network port 3000.

Now we have an active image that can deploy our app on containers let’s feed this docker-compose

Time to create the docker-compose.yml file

Screenshot from the Docker Compose Test and Development Workflow walkthrough at step 16; the adjacent article text explains that time to create the docker-compose.yml file.
version: '3'
services:
   web:
      build:
         context: .
         dockerfile: Dockerfile.dev
      ports:
         - "3000:3000"
      volumes:
         - /app/node_modules
         - .:/app

If you want to know why version 3 go here:

Context: .     This is for the current working directory
We are calling out a specific Dockerfile
Added in port mappings
I added in volumes here because doing any earlier would have been a lot of unnecessary work

Screenshot from the Docker Compose Test and Development Workflow walkthrough at step 17, showing Creating network “webappinferno_default" with the default driver; the adjacent article text explains that $ docker-compose up -build.

$ docker-compose up –build

Screenshot from the Docker Compose Test and Development Workflow walkthrough at step 18; the adjacent article text explains that $ docker-compose up -build.

Success!  Plus it is giving us a URL with port 3000 to hit.

Screenshot from the Docker Compose Test and Development Workflow walkthrough at step 19; the adjacent article text explains that success! Plus it is giving us a URL with port 3000 to hit.

We are once again able to hit the webpage

What if you need to make a change to your app?

Screenshot from the Docker Compose Test and Development Workflow walkthrough at step 20, showing Removing network webappinferno_default; the adjacent article text explains that what if you need to make a change to your app.

$ docker-compose down

Screenshot from the Docker Compose Test and Development Workflow walkthrough at step 21; the adjacent article text explains that $ docker-compose down.

This will bring down the application that is actively running

I’m going to edit the App.js file to say something different

Screenshot from the Docker Compose Test and Development Workflow walkthrough at step 22, showing Creating network “webappinferno_default" with the default driver; the adjacent article text explains that the author is going to edit the App.js file to say something different.

$ docker-compose up –build

Issuing the build once again because changes have been made – had I not made changes then just docker-compose up would have worked

Screenshot from the Docker Compose Test and Development Workflow walkthrough at step 23; the adjacent article text explains that issuing the build once again because changes have been made - had I not made changes then just docker-compose up would have worked.

As you can now see the modifications are showing on the webpage

Summary:
In part one here we deployed an app and turned it into a Dockerfile.  Then we created a YAML file for docker-compose and successfully deployed our app using docker-compose.  Also, we made changes to the source code and re-deployed our app with a simple up –build command and saw the changes reflected on the webpage.  I’m looking forward to showing you what’s next in part 2.  As always, I hope y’all find this useful.

Leave a Reply

Discover more from Digital Thought Disruption

Subscribe now to keep reading and get access to the full archive.

Continue reading